Connecting to HPC
Nasir Mahmood Abbasi, PhD
Bioinformatics Educator

Learning Objectives & Prerequisites
- Prerequisites: Complete Basic Navigation and obtain cluster hostname, username, authentication method, and local terminal access from your institution.
- Objective: Connect securely to an HPC cluster with SSH, transfer files appropriately, and distinguish local from remote paths.
- Expected Output: A documented SSH configuration and a successful login to the assigned cluster without exposing credentials.
Suggested route: use the Bioinformatics Learning Path to review any prerequisite stage before continuing.
Connecting with SSH (Windows)
Windows
Download and install MobaXterm.
Generating a pair of keys
Run MobaXterm, click on Start local terminal, and execute the following command:
ssh-keygen -t rsa -f my_hpc_key
This command will prompt you for a passphrase twice and create two files: my_hpc_key (the private key) and my_hpc_key.pub (the public key). Keep both files in a protected local folder such as C:\Users\XXX\Documents\MobaXterm\home\ (replace XXX with your user name).
What to do with the keys
Security rule: Keep
my_hpc_keyon your local computer. Never email it, upload it to cloud storage, commit it to Git, or copy it to the cluster or another remote host. The cluster administrator authorizes the matching public key (my_hpc_key.pub) in your account, usually in~/.ssh/authorized_keys.
When connecting from another trusted personal computer, create a separate local key pair for that device and ask the administrator to add that device's public key. Use the private key only in the SSH client running on the computer you control.
Connecting with SSH
If you want to run graphical applications from outside the university’s network, or if you prefer a graphical desktop, refer to the Connecting with NX section.
From inside the university’s network
In the MobaXterm window:
- Click on
Session(upper left corner), thenSSH. - Fill the
Remote Hostfield withhpc.example.edu(replace with your institution's HPC address). - Tick the
Specify usernamebox and enter the login name provided by the administrator. - In the
Advanced SSH settingstab, tick theUse private keybox and set its location to your private key file. - Click
OK. - A new session should appear in the left panel; double-click it to connect.
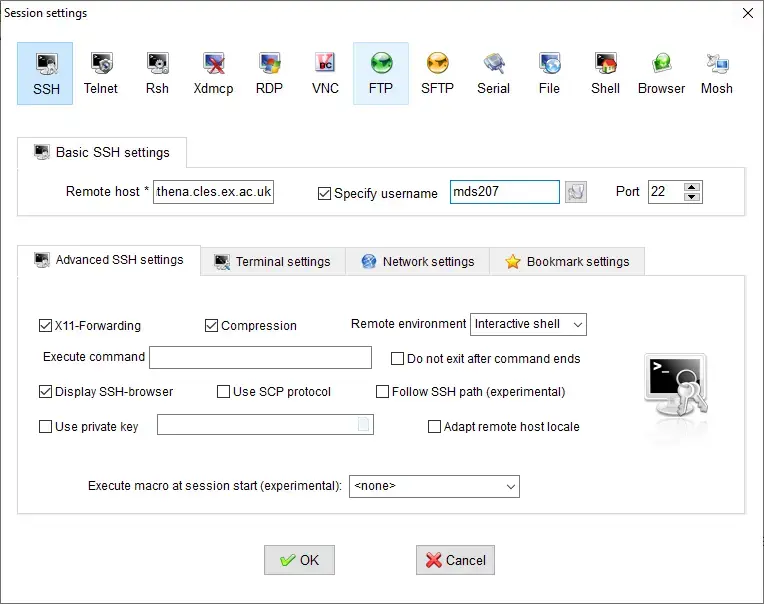
From outside the university’s network
Once connected via VPN, refer to the instructions in the "From inside the university’s network" section above to establish your SSH connection.
File transfer
Once connected with MobaXterm, you can easily transfer files by dragging and dropping them in the left panel.
Connecting with SSH (Linux / Mac)
Connecting with SSH
If you want to run graphical applications from outside the university’s network, or if you prefer a graphical desktop over the console, refer to the Connecting with NX section.
From inside the university’s network
Add the following lines to your ~/.ssh/config file. Replace your_username with the login name provided by the administrator:
Host hpc_alias
        Hostname hpc.example.edu
        User your_username
        IdentityFile ~/.ssh/my_hpc_key
Explanation:
* Host hpc_alias: This line defines an alias (hpc_alias). The options that follow this line will only be applied when ssh recognizes this alias.
* Hostname hpc.example.edu: Specifies the address of the remote host.
* User your_username: Defines the username to use for the connection.
* IdentityFile ~/.ssh/my_hpc_key: Tells ssh to use the specified private key for authentication.
With this configuration, you can connect using:
ssh hpc_alias
Important: The following command will not work as expected because the IdentityFile option will not be used:
ssh your_username@hpc.example.edu
The alias hpc_alias can be changed to any name you prefer.
From outside the university’s network
To connect from outside the university’s network, you must first request VPN access from the network administrator. Once granted, follow the instructions provided by the administrator.
Alternatively, if you prefer not to use a graphical VPN client (like gnome or network-manager), you can:
- Install
openvpn. - Download the configuration files from the provided address.
- Extract the archive and navigate into the directory.
-
With root privileges, run:
bash
openvpn vpn-univ-TCP-443.ovpn
Once connected via VPN, refer to the instructions in the "From inside the university’s network" section above to establish your SSH connection.
Connecting with NX
Connecting with NX
Install x2goclient. It may be available as a package for your Linux/Mac distribution, or you can download it (also for Windows) from the provided link.
To set up a new session:
- Click on
Session, thenNew session…. - Optionally, change the
Session name. - Enter
hpc.example.eduin theHostfield. - Fill in the
Loginfield with your username. - Set the location of your private key in the
Use RSA/DSA key for ssh connectionfield. - In the
Session typebox, choose either:XFCEfor a graphical desktop environment.Single application, thenTerminalfrom the right drop-down menu for a terminal session.
- Click
Ok. The session should appear in the right panel. Click on it to connect.
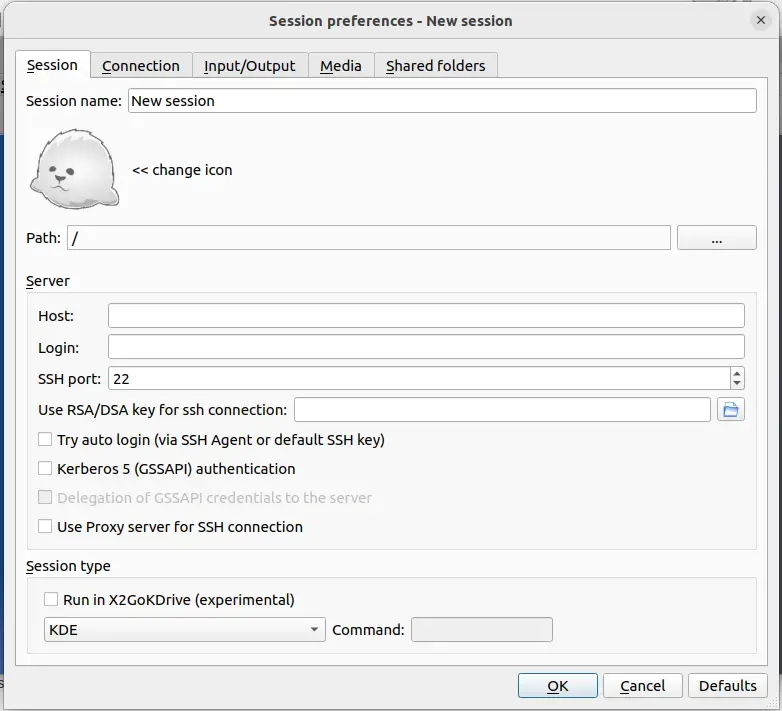
Important: If you are outside the university’s network, you must first connect to the VPN. Refer to the From outside the university’s network section above for VPN instructions.
Knowledge Check & Assessment
1. Concept Verification
What information is needed to establish an SSH connection, and why should passwords or private keys never be shared?
2. Practical Execution
Create an SSH config alias for an authorized cluster, log in, run hostname and pwd, then log out safely. Pass Criteria: Record the command or analysis choice, keep the output, and explain why it answers the stated task.
3. Troubleshooting
If SSH fails, how will you distinguish an incorrect hostname, network/VPN issue, permissions problem, and authentication failure?
Reviewed: April 2026
All commands and outputs were verified with the software versions listed in this tutorial. If you encounter reproducibility issues, please report them through the Contact page.
Author: Nasir Mahmood Abbasi, PhD · Category: High-Performance Computing (HPC)